
Run CUBA on AWS ECS - Part 2
Having talked about AWS ECS in general and walked through the required setup, in this second part of the AWS ECS article we will create a simple ECS cluster and deploy the created Docker containers onto it.
In the last blog post we left off with a ECR repository filled up with our Docker image of the cuba-ordermanagement application. Actually there were two separate repositories for each application component (middleware and web client).
In the first part we “just” got the ECR binary push working. But with the additional setup we prepared the ground for the steps to be taken in this part. So without further ado, let’s prepare the second arrow of the diagram: the ECS deployment.
Create an ECS cluster

The first thing to do for a successful deployment is to create an ECS cluster. The corresponding ECS management UI lists all existing clusters. Creating a cluster now means nothing but defining its name. However, the defined name will be needed later on as a reference to the cluster in scripts. So, we will take “cuba-ordermanagement-cluster” in this case.
EC2 instances for ECS cluster
After creating the ECS cluster, we need to assign EC2 instances to it. This case is worth mentioning. Since ECS is just an orchestration engine for Docker, nothing prevents neither saves us from defining the underlying execution system. Due to this we will take a look at the EC2 management UI.

The launch wizard for creating a EC2 virtual machine allows us to select different options to create an instance. The list is pretty comprehensive; therefore, I will just mention the relevant settings. Amazon machine image
Generally, it is possible to create EC2 instances with any Linux distribution. However, that would require a little more handwork. The reason is that in order to communicate with the ECS orchestration engine, the Linux distribution needs to run a specific ECS agent (as a Docker container).
Due to this fact we will follow the AWS recommendation and use the pre-configured machine image: Amazon ECS-Optimized Amazon Linux AMI (can be found via the AWS marketplace). This image already includes everything needed to act as a ECS EC2 instance. Instance type
As an instance type, a t2.micro instance will work out for the ordermanagement application (which is good because this instance type works with the free usage tier of AWS).
Instance configuration
In step “3. configure instance” the IAM role “ecsInstanceRole” has to be chosen (I assume you have already created it during the setup in the first part - otherwise take a look at the docs).
Additionally, make sure that the EC2 instance’s configuration option “Auto-assign Public IP” is set to Enabled (or “use subnet setting (enabled)”), so that we can access the web UI later without further problems. In the section “advanced details” > “user data” the following script will configure the instance to work with the previously created ECS cluster:
#!/bin/bash
echo ECS_CLUSTER=cuba-ordermanagement-cluster >> /etc/ecs/ecs.config
That are the main points. Other settings can be left at default for now. We will change it in the next part towards a more sophisticated setup, but for the beginning it will be enough. If you have problems following my instructions, you can take a look at the “Launching a ECS instance” guide directly from AWS.
After setting up the EC2 image, it can be started. A couple of seconds later the instance should be up and running. Beyond that, when you look at the ECS cluster details view within the tab “ECS instances”, the EC2 instance should be listed.
ECS task definition
A task definition in the ECS world is very similar to the docker-compose.yml file introduced in the last Docker blog post. A task definition defines how one or many different Docker images should be run. Port mappings can be defined as well as environment variables and volume mountings. In this regard there is no difference to a docker-compose.yml file. The difference between them is that specific AWS features IAM roles or the log configuration for the Containers that are used for certain containers.
In the repository I created a template task definition that looks like this:
{
  "family": "cuba-ordermanagement",
  "containerDefinitions": [
    {
      "essential": true,
      "name": "cuba-ordermanagement-app-core",
      "image": "1234567890.dkr.ecr.us-east-1.amazonaws.com/cuba-ordermanagement-app-core:%CUBA_VERSION%",
      "environment": [
        {
          "name": "CUBA_ECS",
          "value": "true"
        },
        {
          "name": "CUBA_CLUSTER_ENABLED",
          "value": "false"
        },
        {
          "name": "CUBA_DB_NAME",
          "value": "cuba-ordermanagement"
        },
        {
          "name": "CUBA_DB_HOST",
          "value": "cuba-ordermanagement.xhgs6jjsnl.us-east-1.rds.amazonaws.com"
        },
        {
          "name": "CUBA_DB_PASSWORD",
          "value": "1234567890"
        },
        {
          "name": "CUBA_DB_USERNAME",
          "value": "cuba-ordermanagement"
        },
        {
          "name": "CUBA_DB_PORT",
          "value": "5432"
        },
        {
          "name": "CUBA_WEB_PORT",
          "value": "80"
        }
      ]
    },
    {
      "memory": 256,
      "portMappings": [
        {
          "hostPort": 80,
          "containerPort": 8080,
          "protocol": "tcp"
        }
      ],
      "essential": true,
      "name": "cuba-ordermanagement-app",
      "image": "1234567890.dkr.ecr.us-east-1.amazonaws.com/cuba-ordermanagement-app:%CUBA_VERSION%",
      "environment": [
        {
          "name": "CUBA_ECS",
          "value": "true"
        },
        {
          "name": "CUBA_WEB_PORT",
          "value": "80"
        },
        {
          "name": "CUBA_CORE_URL_CONNECTION_LIST",
          "value": "http://cuba-ordermanagement-app-core:8080"
        }
      ],
      "links": [
        "cuba-ordermanagement-app-core"
      ]
    }
  ]
}
The task definition creates two containers: cuba-ordermanagement-app-core and cuba-ordermanagement-app. They reference an image from the previously created ECR repository (thus you have to replace the registry host name with the real one). The version %CUBA_VERSION% should be replaced later either manually or via a script (as we will see later).
Both define different environment variables (CUBA_) that are required to start the container. For the middleware app (app-core) the DB connection has to be setup (CUBA_DB_). For the web application the URL for the middleware server(s) have to be set (CUBA_CORE_URL_CONNECTION_LIST).
Besides that, Tomcat has to know the host name (CUBA_WEB_HOST_NAME) it’s running on as well as the port that the application is listening on (CUBA_WEB_PORT). In case ECS is active, the host name can be determined automatically (CUBA_ECS).
In the links section of the web application references the middleware application so that the Docker containers could communicate with each other. For the web application, a port mapping has to be setup for the web application to be accessible from outside the EC2 instance.
To create the task definition you can go to the management console and click “configure via JSON” and paste the template in (mind replacing the %CUBA_VERSION% template with latest), or you can use the UI to create the task definition.
Having created the task definition successfully, we will go to the last missing piece: the ECS service.
ECS service for cuba-ordermanagement
The last thing on the way to run our CUBA application on ECS is the ECS service. A service is responsible for running a certain task definition within a ECS cluster. To create a service, open the ECS cluster detail view. In the Tab “Services”, the button “Create” will lead you to this page:

Define a service name “cuba-ordermanagement-service”. The cluster and the task definition should be obvious. The “:1” is the revision for the task definition. A task definition can’t be changed but a new revision will be created in this case.
The number of tasks defines how many instances of the task definition and therefore the number of Docker containers we need to run at any given time. For now, we will use “0”, so that the ECS service is not directly going to deploy the application, as we will do this within the deployment script later. In a scenario for higher availability, the number would be higher. In case one Docker container or EC2 instance goes down, the ECS service will notice this and start another Docker container / ECS task.
There are other possible options available for a ECS service, like to configure an auto-scaling group or a load balancer. We will go into a little more detail on them in the third part of the article.
Create a RDS instance

As I showed at the diagram in the previous part, we will use RDS as the relational database backend for the cuba-ordermanagement application. To achieve this goal, we will use the relational database service from AWS to get a fully managed DBMS instance.
First of all, we navigate to the RDS management UI. There we choose “launch DB instance”. Next we select “PostgreSQL” as the database server (you can use other vendors as well - basically anything that CUBA / JDBC supports, but I’ll stick with PostgreSQL for now). There is a couple of options now. First the wizard asks if it will be a production or a testing database. There are a few settings behind that decision like multiple AZ, automatic backup etc. We will select testing for now. Next up there is a couple of options that are finer grained than before. Version, Licensing, DB instance type, multi AZ, storage type (provisioned SSD, general purpose SSD, magnetic), storage allocation, backup are just a few to mention.
As a DB instance identifier I used “cuba-ordermanagement-rds” and for a DB master username I used “cuba-ordermanagement” as well as the database name (in the next step).
In the last page of the wizard there are VPC and subnet settings. You can choose the same VPC (should be only one right now) and subnet as your EC2 instance is in.
The security group defines what resources can access the DB instance. Just choose “Create new security group” - we can change this later. The attribute “publicly accessible” can be set to false, because only the EC2 instance needs to access the instance.
The backup retention period can be set to “0” for now, because we will not have any data that would be worth taking backups of. The configurability is very comprehensive. Moreover, if you think about it, AWS allows a run-of-the-mill developer like me to create a DB cluster that is so powerful, secure and reliable with the effort of a 3 step wizard - this is quite empowering.
With this in place, the DB instance should start and be ready to go in a few seconds. After setting up the correct credentials in the task definition from above, we now can actually deploy our application.
Deploy application to ECS cluster
When everything is set up correctly, we can actually deploy the application to the ECS cluster. The overview shows what we have already achieved in the first part of the article as well as what we covered in this part:
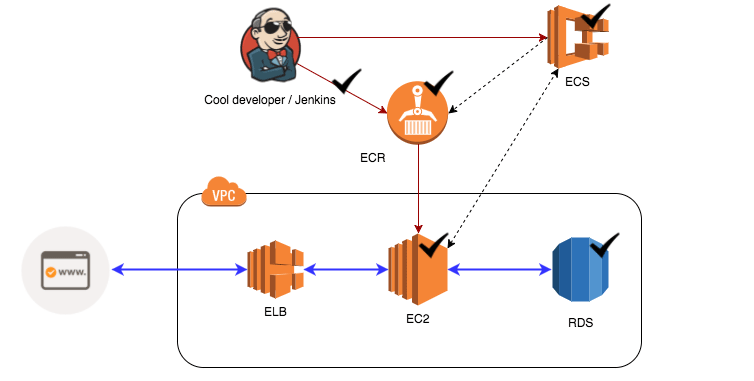
The arrow from the cool developer to the ECS service is what we will do next. To do this all the previous steps are required. However, they allowed us, with only one shell script, to activate now a whole bunch of these arrows. For this purpose I created one main shell script and a few helper scripts. The main script deploy-to-ecs.sh does the following:
- retrieves the application name and application version from the command line,
- checks if there is a Docker image for the given application name and version in the ECR,
- uses the task definition template to register a new task definition revision,
- stops the ECS service,
- updates the ECS service’s task definition,
- starts the ECS service.
I made this script using the AWS CLI as well as some pretty cool command line tool for JSON parsing: JQ (some grep, sed and awk as well).
I will not go into the details of this script, first of all, because there is some error handling and comments going on there which would blow up the listing here. Secondly it would be a little bit in too much detail. The main point is that I used the CLI of the cloud provider in order to automatically deploy our application.
Here are the main AWS CLI parts:
# ...
sed -e "s;%CUBA_VERSION%;${CUBA_VERSION};g" ${TEMPLATE_FILE} > CUBA-${CUBA_VERSION}.json
aws ecs register-task-definition --family ${TASK_FAMILY} --cli-input-json file://CUBA-${CUBA_VERSION}.json

# ...
aws ecs update-service --cluster ${CLUSTER_NAME} --service ${SERVICE_NAME} --task-definition ${TASK_FAMILY}:${TASK_REVISION} --desired-count ${DESIRED_COUNT}

# ...
This is quite a straight forward way of API i would say.
When executing the script like this:
$ deployment/ecs/scripts/deploy-to-ecs.sh cuba-ordermanagement latestit should use what is currently the latest Docker image(s) and deploy them straight to ECS. You can access them via http://public-ip-of-EC2-instance/ like this:
Summary
So, what did we achieve in this second part of the article? We created the actual ECS building blocks with the cluster, the task definition and the service. Alongside this, we additionally created the underlying EC2 and RDS instances in order to have a runtime for the ECS cluster.
We saw the different options on how to communicate with the AWS cloud. In the initial phase we used the management UI to create resources. Later in the script, we saw that everything that can be created via the UI can also be created and edited via the AWS CLI.
The script allows you to deploy easily the latest release of your application to the already existing ECS cluster.
What’s next?
As I mentioned, this is a three-part series on AWS and how to create a production like environment with ECS. When we look at the currently implemented cluster, there are a few things that could have been done better. This is what the last part will cover.
We will use ELB in order to load balance traffic to more than one web application. Then we will start to cluster (on a CUBA level) the application parts. There are a few gotchas to hop over when we want to cluster the middleware layer of CUBA on AWS. In case you have different security requirements on the different parts of your application, you might also be interested in the different VPC features of AWS and how we can arrange our ECS cluster so that certain parts of the application layers are not internet accessible.
So, by this I would like to close this second part and hope you enjoyed it. If you have any comments, feedback or opinions on the article, please let me know.