
Run CUBA on AWS ECS - Part 3
In this third part of the ECS article series we’ll take a deeper look into the more advanced capabilities of the AWS world in order to enhance our current ECS deployment. Separating the application layers to scale independently is one of the main aspect of this article.
When talking about clustering of a CUBA / Docker application with different parts, then there are several variants that could solve this problem to different degrees. To get a good overview about them we will first look into these variants and then go into the variant that we will cover in this article. But as these variants differ in underlying objectives of clustering they cover, we will first have a look at the latter.
Objectives for different cluster scenarios
When we want to cluster our application, we do this because of one of the two main aspects: scaling and availability.
Scaling (in this case horizontal scaling) means that we can automatically or at least with very little effort react to higher or lower requirements regarding the amount of users and therefore amount of servers.
Availability means that there is roughly no single point of failure. It means that we can guarantee the uptime of the system to a specific percentage (normally a high percentage). When we want to achieve availability, we have to take a look at the different components of the application and the environment in order to make sure we have no single point of failure in any of the components. A few components that we control and that are not parts of the Service of AWS are EC2 instances, Container instances, CUBA middleware cluster communication mechanisms
Different variants for clustering
The different approaches distinguish themselves mostly on how to do networking and if the different components are seen as a Service with the corresponding uptime guarantees from AWS.

Variant A: Using overlay network (docker swarm)
The first approach of docker clustering is to not use the underlying network possibilities of the Cloud provider (AWS) at all. In this case we would instead use the network capabilities that Container ecosystem provides. In case of Docker it would be either a docker swarm which allows to spin up an overlay network among different docker hosts, or something like kubernetes. ECS unfortunately does not allow to create overlay networks out of the box. This means that in this variant we would have to not use ECS or try to bake it in our own solution like done in this example with an integration between ECS and weave.
In this variant the EC2 instances would be regarded as a Service that we don’t control and therefore don’t care about (because all container communication is done via the overlay network).

Variant B: single ECS cluster, multiple ECS services
In the second variant we can create a single ECS cluster and attach different EC2 instances to it. This pool of EC2 instances are responsible for running Docker containers. Then we can create different ECS services that will handle the different application components like middleware or web application.
This approach allows us stay in the ECS world a little more. To communicate between the application components we would have to use ELBs for every service in order to communicate e.g. between the web application and the middleware component.
Like in the last variant, the EC2 instances would be regarded as a Service, meaning that we will just not care about them at all. Probably the EC2 instances would be grouped in a EC2 auto scaling group to handle the load automatically.

Variant C: multiple ECS clusters with separated EC2 instances
In the last approach we will take a look at, we use different ECS clusters. The reason is that we want to launch different EC2 instances in the different ECS clusters.
In this approach we will take full advantage of the AWS networking platform and put the EC2 instances in different security groups within different subnets and different AZs. As we see here, we rely on the AWS networking features for the EC2 instances and the Docker containers within the EC2 instances will not be placed within an overlay network at all.
This approach makes sense if we want to take control over the underlying EC2 instances and apply security constraints on them. Another reason might be that you have specific requirements regarding the hardware that powers the EC2 instance like SSD storage with provisioned IOPS.
The approach for this article
Although the approaches differ in the degree of flexibility and maintenance efforts, they are mostly the same from a 10’000 foot view. Also there is no solution that should be taken because it is the best, but instead they have to be chosen because of the different requirements regarding security, performance and ease of use.
For this blog post we will opt for variant C with different ECS clusters and separate EC2 instances. This is mostly done to talk a little bit about the networking features of AWS. You can find the imaginary security requirements for our deployment below in this article.
It’s worth mentioning that with the 1.12 release of Docker they introduced another very interesting approach regarding deployment to AWS, which is described in this blog post: Docker for AWS. Probably I’ll do another blog post on this one because it eliminates the missing overlay network in the ECS deployment.
But for now let’s take a closer look at what we have to do in order to achieve Variant C.
Enhancements for the current deployment
There are several topics to cover in this advanced part. The first enhancement in the ECS deployment is that the different layers of the CUBA application are currently deployed with the same task definition. This is really straightforward but it requires to scale the application as a whole, meaning that the application always has the same amount of frontend instances as middleware instances.
Although this might also be a valid scaling options, we will not go that way. Instead we will first deploy the layers on different ECS clusters. To deploy the application layers independently we will separate the middleware part of the cuba-ordermanagement application from the web application.
creating second ECS cluster for middleware
To create another ECS cluster we can use the AWS CLI for the middleware application layer like this (cluster name: “cuba-ordermanagement-cluster-core”):
$ aws ecs create-cluster --cluster-name=cuba-ordermanagement-cluster-core
{
    "cluster": {
        "status": "ACTIVE",
        "clusterName": "cuba-ordermanagement-cluster-core",
        "registeredContainerInstancesCount": 0,
        "pendingTasksCount": 0,
        "runningTasksCount": 0,
        "activeServicesCount": 0,
        "clusterArn": "arn:aws:ecs:us-east-1:123456789010:cluster/cuba-ordermanagement-cluster-core"
    }
}
This will give us the possibility to create another EC2 instance that should join this new cluster. The next thing is that we create this EC2 instance, but first we will think about the security requirements for this backend instance.
Middleware security requirements
In the EC2 instance creation wizard we have to make certain decisions regarding networking and security, so before going right into creating the instance, we should take a look at the security goals that we want to achieve for the middleware layer. The middleware servers should…
- have no incoming internet access
- only be accessible from the web application servers
- be the only layer with access to the RDS service
To achieve this goals we will take a look at the already mentioned VPC feature of AWS.
AWS Virtual private cloud - VPC
I talked about VPC already briefly in the first part of the article. Your AWS account has one default VPC per region. Every resource like a EC2 instance is created within this VPC by default. The default VPC one or multiple subnets and can have multiple security groups associated to it.
To start with use the “create VPC” button on the VPC overview. The name for our VPC will be “cuba-vpc”. The CIDR block describes the ip address range that is used for this VPC. We will use 10.0.0.0/16 for now. If you are not familiar with what CIDR is, basically the /16 describes the bit mask that defines the network part. So in this case the first two numbers (10.0) will be our subnet part and the following two numbers are for our hosts within the network. You might take a look at the CIDR wiki article for more information.
Subnet creation for CUBA-VPC
Next we will create two subnets within this vpc. You have to define a unique name for the subnet and the CIDR block that has to be placed within the VPC CIDR block.
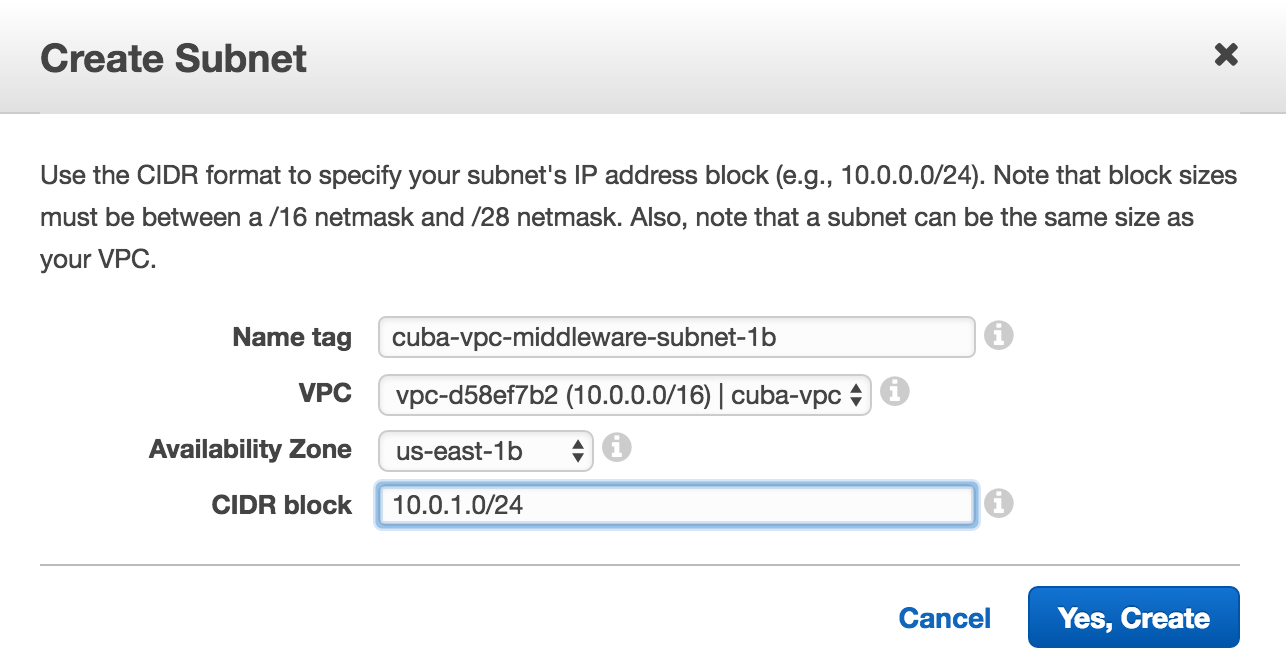
We create the following four subnets:
- cuba-vpc-middleware-subnet-1a, CIDR:
10.0.0.0/24, AZ: us-east-1a - cuba-vpc-middleware-subnet-1b, CIDR:
10.0.1.0/24, AZ: us-east-1b - cuba-vpc-web-subnet-1a, CIDR:
10.0.2.0/24, AZ: us-east-1a - cuba-vpc-web-subnet-1b, CIDR:
10.0.3.0/24, AZ: us-east-1b
With this we have for the middleware as well as for the web layer two subnets that are in different zones of availability. We have the basis for creating EC2 instances that will basically live in two datacenters, so that an outage of an AZ will not affect the application.
Configure internet access for subnets
In order to communicate with the internet and with AWS services like the ECS scheduler, the instances have to be able to talk outside the 10.0.0.0/16 network. There are different approaches to enable that. Since this is another broad topic, I’ll take a little shortcut here: All subnets must have an entry in their “Route Table” Tab with 0.0.0.0/0 that points to an Internet Gateway (one IGW should already be there due to the default VPC in your account). You have to adjust this in the Route Table section.
Another common (and more suitable) approach is to use the NAT Gateway that will grant access to the instances of the VPC via network address translation. For more information you may take a deeper look into the VPC NAT Gateway section.
Security groups for FE and BE
After setting up the networking part correctly we can adjust the firewall settings so that we can define what traffic is allowed for the different subnets & resources.
When we go to Security Groups via the management UI we can create the following two security groups: cuba-vpc-middleware-security-group and cuba-vpc-web-security-group. In the Inbound Rules tab of the middleware security group we can define what traffic is allowed for incoming requests for resources associated with this security group. Let’s create the following rules:

The cuba-vpc-web-security-group will have access to port 8080 from 0.0.0.0/0 - the Internet.
Running EC2 instances in this VPC
After doing all the heavy lifting regarding the networking structure, we are at the point to re-create out EC2 instances that should run the Docker containers. I’ll go only briefly into this topic because we created this configuration for the EC2 instances already in the second part.
We already created the second ECS cluster. Now we can use the EC2 instance wizard to create the following four EC2 instances:
| EC2 instance name | security group | Auto-assign Public IP | Subnet | User data | Network |
|---|---|---|---|---|---|
| cuba-ordermanagement-ec2-instance-middleware-1 | cuba-vpc-middleware-security-group | false | cuba-vpc-middleware-subnet-1a | ECS_CLUSTER=cuba-ordermanagement-cluster-core | cuba-vpc |
| cuba-ordermanagement-ec2-instance-middleware-2 | cuba-vpc-middleware-security-group | false | cuba-vpc-middleware-subnet-1b | ECS_CLUSTER=cuba-ordermanagement-cluster-core | cuba-vpc |
| cuba-ordermanagement-ec2-instance-web-1 | cuba-vpc-web-security-group | true | cuba-vpc-web-subnet-1a | ECS_CLUSTER=cuba-ordermanagement-cluster | cuba-vpc |
| cuba-ordermanagement-ec2-instance-web-1 | cuba-vpc-web-security-group | true | cuba-vpc-web-subnet-1b | ECS_CLUSTER=cuba-ordermanagement-cluster | cuba-vpc |
After starting these instances, both ECS clusters should have two instances associated to it.
Before we see a running CUBA cluster, we have to make two other steps on both layers:
- enable application middleware cluster on CUBA level
- creating a load balancer for the web application
These things we will cover in the next sectons.
Application middleware cluster on CUBA level
As we have created two EC2 instances for our backend, we are right now in a situation where the middleware instances would work out of the box. But there are several cases where the middleware servers have to communicate with each other in order to synchronize their current state. Examples of this would be Locks, Session information etc. When we look at the CUBA deployment docs this scenario is described with two middleware servers (although nothing prevents us from instantiating 5 or 30 servers). In the section “Configuring Interaction between Middleware Servers” the actual communication mechanism is described.
The middleware synchronization is done via the Java library JGroups, which is a “reliable multicast” messaging system. So instead of a centralized model to store session information and distribute them between servers through something like Redis or Memcache is uses a P2P approach where the nodes directly communicate with each other.
How does this relate to our AWS EC2 instances implementation, you might ask? Well, it turns out that like most P2P communication mechanisms I got to know oftentimes it’s a litte bit harder to establish connections between the nodes. The reason for this is that we live in a world of firewalls and port 80 syndroms while JGroups (as a representment of a P2P network) wants to use multicast with UDP by default.
That said, let’s have a look at how to solve this problem. It turns out that JGroups is capable of running in a lot of different supported transport protocols. If we had an overlay network (as described above), it would be a little easier, but with the combination of Docker that acts like a NAT router and P2P it didn’t really work (if you find a solution to this problem, just write down a comment - I’d love to see it).
The solution in this case is to use the Tunnel protocol together with a Gossip Router (that makes up the centralized part of the communication channel). According to their docs I created a bash script that starts the gossip router (which is part of the jgroups distribution jar):
java \
  -classpath lib/log4j-api-2.0.2.jar:lib/log4j-core-2.0.2.jar:lib/jgroups-3.6.7.Final.jar \
  -Dlog4j.configurationFile=file:conf/log4j2.xml \
  org.jgroups.stack.GossipRouter -port 12001
and fired that up on two different EC2 T2-nano instances (for fault tolerance).
In the jgroups.xml of the CUBA app-core instance the following adjustments have to be made:
<TUNNEL
        gossip_router_hosts="${jgroups.gossip_router_hosts}"
        bind_port="7800"
        bind_addr="GLOBAL"
        external_addr="${jgroups.external_addr}"
        external_port="${jgroups.external_port:7800}"
/>
The System property jgroups.gossip_router_hosts has to set through the Docker environment variable: CLOVER_JGROUPS_GOSSIP_HOSTS like I did in the example task definition for the middleware layer.
Load balance front-end application through ELB
The last thing to mention is how to enable load balancing for the web layer of the CUBA application. Luckily ECS makes it really easy to enable such featuers through ELB. As described in the first part ELB balances HTTP requests to different servers. It terminates SSL if necessary and does health checks to dynamically remove unhealty instances from the cluster pool.

To enable ELB we need to re-create our ECS service for the ECS web cluster cuba-ordermanagement-cluster and configure ELB for this service (you have to create a ELB in the EC2 management console before assigning it to the ECS service).
Central logging with CloudWatch Logs
One additional thing, if everything is set up and running in production mode, is that we might want to take a look into the running system. Since the logs are hidden within the container, let’s think about an option to get them easily accessible.
Instead of logging into the EC2 instance to get the Docker container logs, we will use AWS cloud watch logs. ECS has integration to cloud watch logs. It takes STDOUT and STDERR from the Docker container and pushes it into the logging system, where we can easily retrieve the information from Tomcat in a web UI. To get that going the only thing to do is to create a log group in your preferred AWS region. Then you define the name of the log group in the JSON keyawslogs-group like in the task definition example:
"logConfiguration": {
    "logDriver": "awslogs",
    "options": {
        "awslogs-group": "cuba-ordermanagement-testing-logs-app",
        "awslogs-region": "us-east-1"
  }
}
After that the logs will be sent to the central logging system and we can view them via a simple UI that does not require anyone to open an ssh terminal and do crazy grep | tail combinations in order to get any signal from your logs.
Summary on AWS ECS for CUBA
We have gone through a lot of stuff. Probably to much for most readers. Therefore thanks for keeping up until the end. As we have seen in the third article, the world of AWS and topics that come with it are very versatile. Although we covered many topics that are relevant for a production scenario, we’ve choosen a cerain path in favor of many others.
As i said earlier there is no one way anymore on this level, to get your application up and running (and stay up). Approaches like Docker on Kubernetes are much more in the Container as a Service space. In contrast, in the described AWS ECS approach we always had our hands on the bare metal. Sometimes this makes sense and sometimes it doesn’t.
So i hope you had a great time digging into the implementation details on AWS while reading this blog post series. If you have any questions or comments, just write a comment and we can have a conversation about it.