
Custom front-ends for your CUBA app
In this blog post i want to show you how you can create really custom front-ends for your CUBA based application. If you want to have customer facing UI as part of your software, here’s how you can create them.
When you look through the CUBA docs, you’ll find a part which is often mentioned but not described in great detail: the portal module. This is why i want to cover the topic in this blog post.
What is the portal module?
The elevator pitch for the portal module is that you can create custom user interfaces which are not directly part of the CUBA application. Instead it can be deployed independently and communicate with the platform middleware.
Further it does not use the generic user interface of CUBA. Instead the platform gives you the possibility to go down one abstraction level. The portal module allows you to create plain Spring MVC based applications. With this you have total control over the “plain” HTTP based communication. With Spring MVC you could either create HTTP based APIs (if you don’t want to use the generic REST API) or HTML based user interfaces. For the latter one FreeMaker is included into the portal module as the template engine of choice.
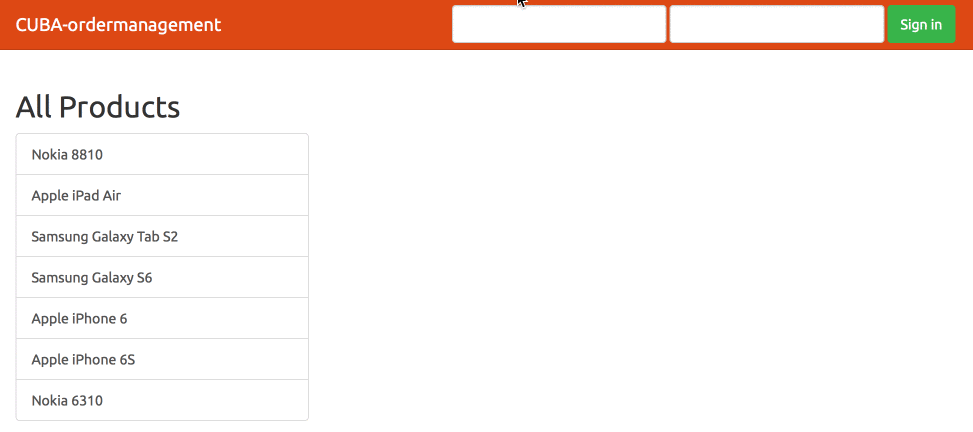
cuba-ordermanagement’s public product catalog
As a basis for this topic we’ll use cuba-ordermanagement. The addition that we want to achieve is the following:
- list all available products
- show details of a product in a detail view
- let the user login on the front-end
This will be achieved by creating a Boostrap based user interface. Here is the result of the UI. This is to give you a feeling about what is possible and where we want to go in the next 5 minutes:
Activate the portal module
First of all, the portal module has to be created in the project. To do this, there is a link in studio within the Project Properties section called Create portal module. Studio will create the module and a little bit of sample code so that you have a solid starting point. In your project files you’ll notice the new module under modules/portal. Looking at the generated code, we see that the PortalController that handles the root URL /app-portal/. When you have a look at it it will show something like this:
@Controller
public class PortalController {

    @Inject
    protected DataService dataService;

    @RequestMapping(value = "/", method = RequestMethod.GET)
    public String index(Model model) {
        if (PortalSessionProvider.getUserSession().isAuthenticated()) {
            LoadContext l = new LoadContext(User.class);
            l.setQueryString("select u from sec$User u");
            model.addAttribute("users", dataService.loadList(l));
        }
        return "index";
    }
}
What we see here is a mix of CUBA logic together with Spring MVC glue code. First, there is the RequestMapping Annotation which indicates the above mentioned route to the root URL.
After this, there is an example on how to get information about the login status of the current user. In case of a authenticated user, all users from the database are added to the model (which will be passed to the view layer).
After this brief overview, let’s start with our first requirement from above: List all products in the view.
Create a public product catalog
To create product catalog that is publicly accessible, we need to slightly change the example. As always, you’ll find the running example on Github.
    @RequestMapping(value = "/", method = RequestMethod.GET)
    public String index(Model model) {

        LoadContext l = LoadContext.create(Product.class).setView("product-view");
        l.setQueryString("select p from om$Product p");
        model.addAttribute("products", dataService.loadList(l));

        if (!PortalSessionProvider.getUserSession().isAuthenticated()) {
            final LoginUserCommand loginUserCommand = new LoginUserCommand();
            model.addAttribute(loginUserCommand);
        }

        return "index";
    }
All products will be fetched from the database (like above). In this case we want the product-view View to be taken for retrieval. This is not directly neccessary to get our job done, but in case we want to show the product category e.g. it might be useful.
In case the user in not logged in, the LoginUserCommand will be additionally passed to the view.
To work with the passed view information we have to take a look at the index.ftl FreeMaker template:
<h2>All Products</h2>

<div class="list-group">
    <#list products as product>
        <a class="list-group-item product">${product.name}</a>
    </#list>
</div>
FreeMaker is a template language that allows you to combine HTML with different elements of normal programming languages like loops, variables, conditional statements and so on. The expressions of the template are parsed and executed. The output of this is a plain HTML structure.
What happens here is basically iterating over the list of products (passed from the controller) and for each product a link is created with the name of the product. This is packed into a bootstrap list-group, so that we have a fairly lovely UI.
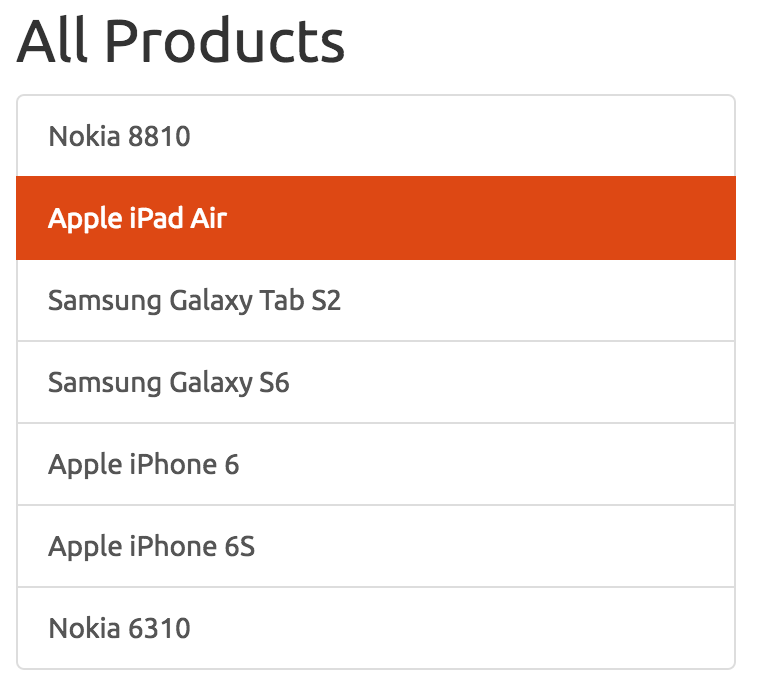
Show details of a product
The next step is to improve the UI so that the user can show details of products. This step is more around Bootstrap and a little bit of JQuery.
There are many possible solutions to achieve the dynamism from the overview image above. It would be possible to load the data asynchronously via Ajax and update the DOM. I choosed a solution where all the data is already on the client at inital delivery of the HTML file. With HTML5 we have the possibility to add any metadata to HTML tags through data-* attributes.
We’ll extend the existing view to store the data inside the product list like this:
<!-- product list -->
<div class="col-md-4">
    <h2>All Products</h2>

    <div class="list-group">
        <#list products as product>
            <#if product.description??>
                <a class="list-group-item product"
                        data-title="${product.name}"
                        data-content="${product.description}">
                ${product.name}
                </a>
            <#else>
                <a class="list-group-item product"
                   data-title="${product.name}"
                    data-content="">
                    ${product.name}
                </a>
            </#if>
        </#list>
    </div>
</div>

<!-- product details -->
<div class="col-sm-8" id="product-detail-column"  style="display: none">
    <h2>Productinformation</h2>
    <div class="panel panel-default" id="product-details">
        <div class="panel-heading"></div>
        <div class="panel-body"></div>
    </div>
</div>
Product title and description are stored in the data-* attributes. There is one gotcha which i stumbled upon: In case there is no description value set for a product, the FreeMaker template will screw up with an exception. To solve this hurdle, there is an explicit null check in-place.
I personally find that a little daunting because null could easily translated to an emtpy string. But as i’m not at all a FreeMaker expert i assume there are resons behind this behavior.
The second part of the markup (starting with col-sm-8) is just an empty template for the product details. After getting the markup inplace let’s have a look at the required Javascript that brings the content to life.
// ...

$(".product").click(function() {
    var productElement = this;
    setProductActiveState(productElement);
    $("#product-detail-column").fadeOut("fast", function() {
        var product = readProductDetailsFromElement(productElement);
        changeProductDetails(product);
        $("#product-detail-column").fadeIn("fast");
    });
});

//...
All elements with the class product (which are the product links with the data attributes from the product list) are selected and a click event is registered.
In case this event occurs, different things have to happen. Firstly the clicked element has to be marked as active (setProductActiveState(productElement)). Next, the product detail column will fade out.
After finishing this animation, the product details will be read from the data-* attributes and stored into the variable product. This will be passed to changeProductDetails to update the hidden product detail column. The last this is fade the column back in.
The complete code of the view is available here.
Activate front-end login
The last thing that i want to show in this example portal module is the ability to login on this front-end. The generated code already contains all ne neccessary bits go do a full login. So in this case, we will just shuffle it a little bit around so that i fits our UI needs a little better.
First of all, as we want to login directly from the main page, there is no LoginController needed to give us the login form. Instead, we just copy the LoginUserCommand in case of a non existing authentication into the PortalController (you already saw that code above).
In the view i created a bootstrap form in the navbar template, which uses the LoginUserCommand like this (navbar.ftl):
<div id="navbar" class="navbar-collapse collapse">
<#if userSession?? && userSession.authenticated>
    <ul class="nav navbar-nav navbar-right">
        <li class="active"><a href="#">${userSession.user.login}</a></li>
        <li><a href="logout">Logout</a></li>
    </ul>

<#else>
    <form
    	class="navbar-form navbar-right"
    	method="POST"
    	action="<@spring.url "/login"/>">
        <div class="form-group">
            <@spring.formInput
                path="loginUserCommand.login"
                fieldType="text"
                attributes="class='form-control' placeholder='Username'"/>
        </div>
        <div class="form-group">
            <@spring.formInput
                path="loginUserCommand.password"
                fieldType="password"
                attributes="class='form-control' placeholder='Password'"/>
        </div>
        <button type="submit" class="btn btn-success">Sign in</button>
    </form>
</#if>
The navigation menu shows a login to the unauthenticated users. This form does a POST to /login with the fields login and password. The actual authentication is handled by Spring Security. Luckily the generated code already includes an authentication provider that handles the authentication agains the middle tier of the CUBA application.
Next we could probably do different stuff for people that are logged in like for example change the product description or display internal information about the product. But i leave it at that for now. It is up to you to come up with something of value for the authenticated users.
The resonable borders of this approach
Although the sky is the limit here, when i starting fiddling around doing this custom UI and thinking about possible use cases for the authenticated users, i had to take a step back and revisited the purpose of this custom UI.
Most things i had in mind, like showing all orders for this product, was just stuff i would normally develop in the actual CUBA app. So this portal module just makes sense if you want to reach out to people that are mostly not users of the system or if they have particular requirements.
One thing that we got out of this approach is the possibility to easily get all product information on their mobile devices because bootstrap made it mobile ready.
Another possibility is to create a JSON API which can be consumed by JS frameworks like AngularJS or by native apps. I haven’t touched this idea for now, but that might be an interesting topic for a future blog post.
I hope you enjoyed this little overview of what you can do with the portal module. If you have any feedback i would love to hear from you via Twitter, Mail or leave a comment below.