
Platform on Platform - CUBA apps on Cloud Foundry
In this blog post I will continue surfing the clouds and will have a look at the operations side of things. It’s about running the CUBA Platform on the Platform as a Service that gains much momentum these days: Cloud Foundry.
In the last blog post about Docker I highlighted how to use container technologies. Docker is a great technology that enables the road to infrastructure as code.
Everything as a Service
But running Docker is just one option to embrace the Cloud mindset. You can create a Amazon EC2 instance, install Docker on your own - this is a IaaS approach. In this case, you have to care about different stuff like orchestration, auto scaling, fault tolerance. Amazon also has more managed approach like EC2 Container Service and Docker itself tries to open up this market with solutions like Docker Datacenter. These alternatives are not really IaaS anymore, but more Container as a Service (CaaS).
CaaS blurs the lines between classic IaaS and the topic I want to talk about in this article: Platform as a Service (PaaS).
Abstracting away your Infrastructure
As you have probalby noticed, it’s a little hard to distinguish between the categories, because the lines between them are dissolving more and more with time. To clearify this a little bit, you can follow this link to get a traditional categorization. I personally like this tweet, that pretty much sums up the differences:
The entire PaaS vs Container (e.g. Docker) debate explained in one simple diagram - pic.twitter.com/B0oib5gihz
— swardley (@swardley) 7. November 2015
In the IaaS / Docker World the application developer has to know and care about stuff like filesystem structures, drivers for certain databases, copy files and set system environment variables Here’s the Dockerfile from the last post that shows this fact pretty good:
FROM tomcat:8-jre8
ADD war/app.war /usr/local/tomcat/webapps/
ENV CATALINA_OPTS="-Dlogback.configurationFile=/opt/cuba_home/logback.xml"
Additionally you have to care about monitoring, backup, fault-tolerance, orchestration and many more things.
To get that going you have different possibilities. You can achieve this stuff that is on top of basic containers with stuff like bash scripts / jenkins / docker commands & tools and so on. But to be honest, when comaring something like this to PaaS, you should keep this in mind:
Sure, you can choose to build your own #PaaS.. Comparing build your own to a structured platform be like.. pic.twitter.com/KBW9KINYHn
— Dan Mearls (@DanMearls) 24. Oktober 2015
So when comparing it to a PaaS, you don’t have to care about this stuff anymore. In fact you are even not able to care about this stuff. The only thing you have to and can tell your PaaS environment is the runtime that you want to use for your application. In Cloud Foundry these environments are called buildpacks.
To get a sense of how that looks like, let’s move to Cloud Foundry and try to deploy a CUBA app on this platform.

Cloud Foundry
Cloud Foundry is an open-source PaaS solution backed up by a lot of big companies. Initially started by VMWare / Pivotal and has become the base solution for different Cloud offerings like IBM Bluemix, HP helios and the Cloud solution from Pivotal itself.
When comparing it to other solutions like Heroku, the fundamental difference is that since CF is open source. This has a different positive side effects. One is, that you can run it in your own datacenter if you want to.
It is also “easier” to change from one Cloud vendor to the next as long as they all share the PaaS or in case of an IaaS provider it’s up to you, to install CF on their infrastructure, because you can install CF on AWS or any other IaaS provider by yourself.
Get ready to go via Pivotal Web Services
So let’s get started with Cloud Foundry. To do so, I have created a free account at Pivotal Web Services, the Pivotal CF Cloud offering, which allowes me to play with CF for 2 month for free.
I choosed the Pivotal offering just out of convenience reasons. If you want to try it in your own datacenter (via OpenStack or VMWare vShpere) or on AWS EC2 instances, feel free to do so.
After creating the account and their CLI installation you are ready to login via the command line:
$ cf login -a https://api.run.pivotal.ioSince you logged in your command line is ready to go to push your application. But first, let’s have a look at the web UI which allows you to view the running instances.
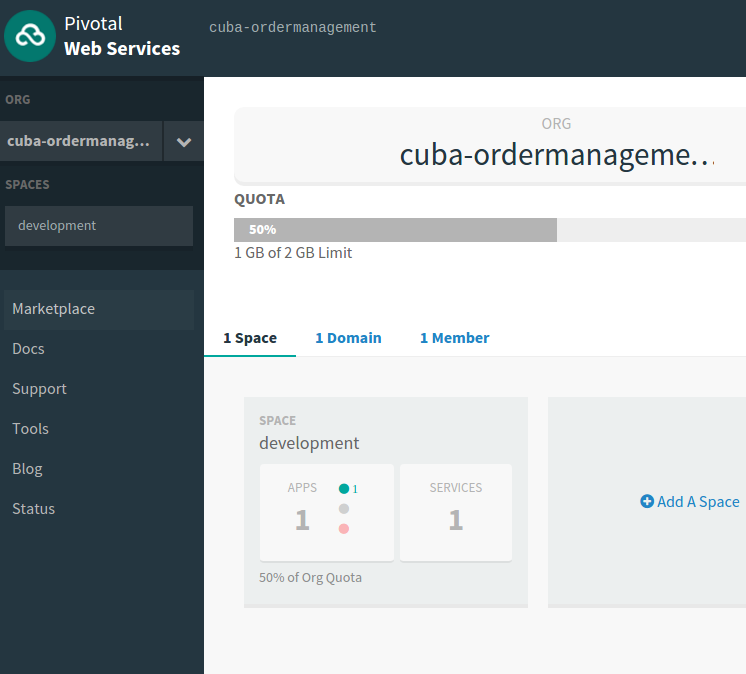
After a successful login you will see a screen similar to this.
First, I created an organisation called “cuba-ordermanagement”. This oragnisation contains one space. A space is an aggregation of services and apps that are scoped via project or an environment.
I created a space called “development”, which should describe the phase of my imaginary continous delivery pipeline.
As you can see on the right, I already started my cuba app and one service, so let’s look at how i came to this point (the shortcut of this is the cuba-ordermanagement github repository where you’ll find the sources in the branch cloud-foundry).
Create Postgres Database in Cloud Foundry
First of all, we have to create a datastore for our cloud version of the cuba app. In IaaS world you would set up a vanilla postgres instance, figure out connection settings and tell your app where to find your datastore.
In Cloud Foundry your database is just another service, that the application can depend on. The Pivotal offering of Cloud Foundry has a couple of services available for stuff like caching, search, (non-) relational datastores, monitoring tools and so on.
When you want to take a look at what the different offerings are, just use the marketplace cmd option.
$ cf marketplaceWe will choose a postgres installation for now. You can either use the web UI or the command line interface:
$ cf create-service elephantsql turtle cuba-ordermanagement-postgreselephantsql is the name for the service (Postgres as a Service) and turtle the service plan (turtle is the free one). cuba-ordermanagement-postgres is the name for the service instance, which we will need to refer to it later.
Now we have the running postgres db installation. Next thing - we have to configure our application to use this datastore.
Make CUBA Cloud-ready ™
There are a few things that have to be changed from the traditional deployment model. We’ll go through these step by step so you should be able to adjust your app right as we go.
1. Springs Cloud Connector for DataSource creation
Within the spring ecosystem there are different packages that handle integration with cloud systems in general and PaaS like Cloud Foundry in particular. In the build.gradle file, coreModule needs two additional dependencies as it is shown below:
configure(coreModule) {
	//...
    dependencies {
        //...
        compile('org.springframework.cloud:spring-cloud-spring-service-connector:1.2.1.RELEASE')
        compile('org.springframework.cloud:spring-cloud-cloudfoundry-connector:1.2.1.RELEASE')
    }
    //...
}
Next, since we want the the database to be looked up from the cloud, we need to override the creation of the dataSource bean. This can be done via dependency injection. In spring.xml of the core module we tell Spring to use the cubaDataSource bean as the Factory bean, which is used throughout the CUBA application.
<bean id="cloudFoundryDataSourceFactory" class="com.company.ordermanagement.cloud.CloudFoundryDataSourceFactory">
    <property name="dbServiceName" value="cuba-ordermanagement-postgres" />
</bean>

<bean id="cubaDataSource" factory-bean="cloudFoundryDataSourceFactory"
      factory-method="createDataSourceForPostgresDbService">
</bean>
The cubaDataSource bean will now be created via the factory method cloudFoundryDataSourceFactory.createDataSourceForPostgresDbService(). The value of dbService attribute of the factory is the service name of the postgres instance we created earlier.
Since this Factory class does not exist yet, let have a look at the implementation:
class CloudFoundryDataSourceFactory {

    String dbServiceName

    DataSource createDataSourceForPostgresDbService() {

        Cloud cf = new CloudFactory().cloud
        def postgresSerciveInfo = cf.getServiceInfo(dbServiceName)
        cf.getServiceConnector(postgresSerciveInfo.id, DataSource, null)

    }
}
With this little glue code inplace (hope you don’t mind me using groovy here), the application is ready to connect to a database via a service name instead of DNS names through the cloud platform.
The only thing that we have to tell to the application is that we actually want to use postgres as our DBMS. When we do this we can additionally put the other required configuration inplace.
2. Setup the *.properties files of the CUBA app
To tell CUBA that it should use Postgres as the DBMS we have to change the app.properties in the core module in the following way:
cuba.dbmsType = postgres
cuba.automaticDatabaseUpdate = true
Additionally we have to change the app.home attribute in app.properties in the core module and the web-app.properties file in the web module to ..:
app.home = ..3. Configure CUBA to be delivered as a single war
To make deployment of the app quite a bit easier, we’ll combine the core and the web module into a single war file. This has some benefits but also some drawbacks regarding to scaling and so on. Due to this it’s up to you if you want to follow this trail.
If you read the docs about the single war approach you’ll see, that we have to create another web.xml and use it during war building.
Just copy & paste the XML file from the docs and put it in the web module to web/WEB-INF/single-war-web.xml. You have to adjust the Context parameter Web Client Application class to fit to your application class. The created file for cuba-ordermanagement you’ll find here.
After doing so, the last thing you have to do is to create a gradle task in the build.gradle file. In this task you reference the newly generated single-war-web.xml as the web.xml file like this:
task buildWar(type: CubaWarBuilding) {
    appHome = '..'
    webXml = "${webModule.projectDir}/web/WEB-INF/single-war-web.xml"
}
4. Create deployment information for Cloud Foundry
Since we can’t really get down to the underlying infrastructure of the app, we are not able to change the way the tomcat (or whatever servlet container is underneath your app in this case) works. But certain metadata has to be given to the PaaS in order to run our application properly, e.g. the java version, the amount of memory required, external services (like datastores) and so on.
For these kind of information, CF requires a file called manifest.yml to be in place. This file is the entry point for the deployment. So the file that we are going to create looks pretty much like this:
---
applications:
- name: cuba-ordermanagement
memory: 1024M
instances: 1
host: cuba-ordermanagement
path: build/distributions/war/app.war
services:
- cuba-ordermanagement-postgres
env:
  JBP_CONFIG_OPEN_JDK_JRE: '{jre: { version: 1.8.0_+ }}'
Note the service name that is referenced from the app instance.
That’s it. Ok, it took a little bit longer than I would like it to be. This is due to the fact that we have done different things here. Not all of them have directly to do with make it cloud ready. Anyway - now we are ready to take the app and deploy it to Cloud Foundry.
Pushing it up into the clouds
First we need to create the war file that we want to deploy:
$ ./gradlew buildWarNext, we do the actual deployment via the command cf push and point it our manifest file:
$ cf push -f manifest.yml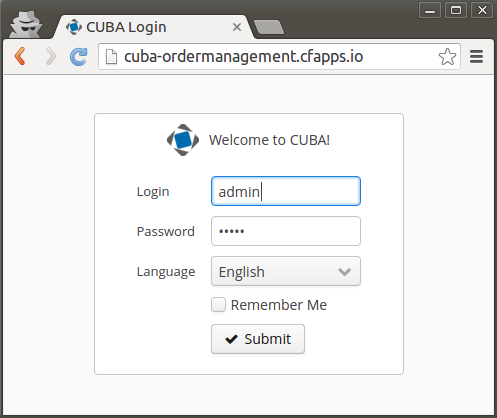
Then the cli will care about uploading the artefact, creating a “server”, connecting it to the service and start up the tomcat installation.
When everything worked out fine, you can access your application at http://cuba-ordermanagement.cfapps.io/ (or whatever Route is defined for the application. You can look it up via the web ui).
Deployment is not the end of the road
Ok, when we look at what we have accomplished with this deployment, we see that we really only doing the first step. We have fulfilled some pre requirements like the single war stuff. Then we did some direct stuff to make the CUBA app runnable in the PaaS environment like the DataSource Generation from Spring Cloud.
We left out some parts, like configuring file storage. In a PaaS you can’t have access to a local directory structure, because the platform don’t lets you know about these kind of infrastructure. You would need something like Amazon S3. Luckily CUBA has a configurable bean cuba_FileStorage which you can inject the implementation AmazonS3FileStorage (included into CUBA Platform).
Another thing is how to do mailing the PaaS way. When you look through the Cloud Foundry marketplace you’ll find services like SendGrid that might make sense to include.
But let’s look at what is missing at a bigger picture. One big benefit from the cloud in general is to be able to scale horizontally. If the traffic of your app increases, spin up more machines and you are ready to go. Well, to be able to do this, your software needs an architecture that allows to do that. Is this the case with CUBA? I’ll leave it up to you to find it out, or you’ll wait until i write about it in a future blog post.
I hope i could give you a good understanding of what it means to use a PaaS and what the differences are compared to approaches like Docker and the whole IaaS space.