CUBA on Kubernetes - Part 2
Kubernetes has become the de-facto standard when it comes to doing container scheduling. Since it is so omnipresent these days, let’s have a look on how to deploy a CUBA application into a Kubernetes cluster. In the second part, we will continue with deploying the application to the existing Kubernetes infrastructure.
Last time we prepared all of the infrastructure including the actual Kubernetes cluster as well as the PostgreSQL DB for the CUBA application. Also we added secrets in order to be able to communicate with the postgres instance.
The next step is that we want to upload our CUBA application to the Google container registry so that we can use the binary of our application during the deployment.
Step 3: Upload your CUBA app to Google cloud
In order to run our CUBA app on GKE, we need to package it as a Docker container image. CUBA itself has a neat description for doing that. In comparison to previous approaches from older blog posts I will this time do it all via gradle. You can take a look at the complete build.gradle in the example application mariodavid/cubarnetes. Here are the relevant parts:
buildscript {
    // ...
    dependencies {
        classpath "com.haulmont.gradle:cuba-plugin:$cubaVersion"
        classpath 'com.bmuschko:gradle-docker-plugin:3.2.5'
    }
}

import com.bmuschko.gradle.docker.tasks.image.Dockerfile
import com.bmuschko.gradle.docker.tasks.image.DockerBuildImage
import com.bmuschko.gradle.docker.tasks.image.DockerPushImage
import com.bmuschko.gradle.docker.DockerRegistryCredentials

// ...

apply(plugin: 'cuba')

apply plugin: 'com.bmuschko.docker-remote-api'

cuba {
    // ...
}

// ...

task wrapper(type: Wrapper) {
    gradleVersion = '4.3.1'
}

task buildUberJar(type: CubaUberJarBuilding) {
    singleJar = true
    logbackConfigurationFile = 'etc/uber-jar-logback.xml'
    coreJettyEnvPath = 'modules/core/web/META-INF/jetty-env.xml'
    appProperties = ['cuba.automaticDatabaseUpdate' : true]
}


task createDockerfile(type: Dockerfile, dependsOn: buildUberJar)  {
    destFile = project.file('build/distributions/uberJar/Dockerfile')
    from 'openjdk:8-alpine'
    addFile("cubarnetes.jar", "/usr/src/cuba/app.jar")
    defaultCommand("java", "-Dapp.home=/usr/src/cuba/home", "-jar", "/usr/src/cuba/app.jar")
}

task buildImage(type: DockerBuildImage, dependsOn: createDockerfile) {
    inputDir = createDockerfile.destFile.parentFile
    tags = ['cubarnetes', 'gcr.io/cuba-on-kubernetes/cubarnetes']
}
Additionally you need to create a uber-jar-logback.xml and a jetty-env.xml in your project. Those files can be generated through CUBA studio.
I changed the jetty-env.xml file slightly so that jetty uses ENV variables to get the JDBC URL & credentials:
  <Set name="url"><Env name="DB_URL"/></Set>
  <Set name="username"><Env name="DB_USER"/></Set>
  <Set name="password"><Env name="DB_PASS"/></Set>
With that in place, to create a docker image locally, use:
$ ./gradlew buildImageto create the image. You can verify that it succeeded and created one image with two different tags via:
$ docker images | grep cubarnetes
cubarnetes                                                            latest              3ba5a7da458f        2 days ago          179MB
gcr.io/cuba-on-kubernetes/cubarnetes                                  latest              3ba5a7da458f        2 days ago          179MB
In order to push a docker image to Google cloud, we have to authenticate the docker command against the GCR repository. Details can be found in the docs, but the main point is to use another gcloud command to do it:
$ gcloud auth configure-dockerSince we tagged the docker image as gcr.io/cuba-on-kubernetes/cubarnetes the US-based registry will be used (see docs for other locations). To push the image up to the registry use the corresponding docker command:
$ docker push gcr.io/cuba-on-kubernetes/cubarnetesWith that, we have a running cluster and a software that we want to run on GKE pre-configured
Step 4: Create Kubernetes deployment
With all of the above in place, we have everything setup for successfully deploying the CUBA application through Kubernetes. The way Kubernetes is deployed is through a deployment YAML file. You can find this file (deployment.yml) in the CUBArnetes repository.
It looks like this:
---
apiVersion: "v1"
kind: "ConfigMap"
metadata:
  name: "cubarnetes-app-config"
  namespace: "default"
  labels:
    app: "cubarnetes-app"
data:
  DB_URL: "jdbc:postgresql://127.0.0.1:5432/postgres"
---
apiVersion: "apps/v1"
kind: "Deployment"
metadata:
  name: "cubarnetes-app"
  namespace: "default"
  labels:
    app: "cubarnetes-app"
spec:
  replicas: 1
  selector:
    matchLabels:
      app: "cubarnetes-app"
  template:
    metadata:
      labels:
        app: "cubarnetes-app"
    spec:
      containers:
      - name: "cubarnetes"
        image: "gcr.io/cuba-on-kubernetes/cubarnetes:latest"
        env:
        - name: "DB_URL"
          valueFrom:
            configMapKeyRef:
              key: "DB_URL"
              name: "cubarnetes-app-config"
        - name: "DB_USER"
          valueFrom:
            secretKeyRef:
              name: cloudsql-db-credentials
              key: username
        - name: "DB_PASS"
          valueFrom:
            secretKeyRef:
              name: cloudsql-db-credentials
              key: password
      - name: cloudsql-proxy
        image: gcr.io/cloudsql-docker/gce-proxy:1.11
        command: ["/cloud_sql_proxy",
                  "-instances=cuba-on-kubernetes:europe-west1:cubarnetes-postgres=tcp:5432",
                  "-credential_file=/secrets/cloudsql/credentials.json"]
        volumeMounts:
          - name: cloudsql-instance-credentials
            mountPath: /secrets/cloudsql
            readOnly: true
      volumes:
        - name: cloudsql-instance-credentials
          secret:
            secretName: cloudsql-instance-credentials
---
apiVersion: "autoscaling/v1"
kind: "HorizontalPodAutoscaler"
metadata:
  name: "cubarnetes-app-hpa"
  namespace: "default"
  labels:
    app: "cubarnetes-app"
spec:
  scaleTargetRef:
    kind: "Deployment"
    name: "cubarnetes-app"
    apiVersion: "apps/v1"
  minReplicas: 1
  maxReplicas: 5
  targetCPUUtilizationPercentage: 80
---
apiVersion: "v1"
kind: "Service"
metadata:
  name: "cubarnetes-app-service"
  namespace: "default"
  labels:
    app: "cubarnetes-app"
spec:
  ports:
  - protocol: "TCP"
    port: 8080
    targetPort: 8080
  selector:
    app: "cubarnetes-app"
  type: "LoadBalancer"
  loadBalancerIP: ""
Let’s go through it piece by piece. I will not cover all the details, because this the best place for looking up all the details is the documentation of Kubernetes itself, but we will go over the main parts.
The different parts are separated by ---. Let’s look at the first part - the ConfigMap.
A single place for configurations: the ConfigMap
A ConfigMap is used to put configuration options of the deployment to a dedicated place. This way the configurable pieces are held together and are not scattered throughout the whole deployment file. Items in the ConfigMap are just Key-Value based entries which allow you to store all settings that should be configurable in your application (like environment information, DB URLs etc.).
Deployment description - the umbrella artifact for a webservice
The next thing defines the main part of the deployment (kind: “Deployment”).
In this section the pods (and therefore the containers) are described. The container reference a Docker image (e.g. gcr.io/cuba-on-kubernetes/cubarnetes:latest) which will be used. So this is the connection between the description of a software deployment and the application binary that should be deployed. With the reference to the google container registry (grc.io) the information where to get the binary is also figured out. GKE works natively with GCR, so there is no explicit need to configure authentication against the registry.
Furthermore the environment variables of the container are defined. Above I said that I externalized the three parameters DB_URL, DB_USER and DB_PASS from the container image. This is the point where the values are injected into the containers.
As we do not want to hard-code the credentials in our deployment.yml file, the file references the secrets mechanism from Kubernetes where we inserted our secrets in the first part.
Side car container for connecting to the DB
One thing to mention is the fact, that there is not only one container defined (the CUBA application) within the pod, but actually two. The second container with the name cloudsql-proxy is a side-car container, which acts as a proxy for the DB connection.
Instead of letting the CUBA application directly talk to DB, it will use the side-car container to actually connect to it. This approach is pretty common, as it allows to separate different concerns. On the one hand, the application can assume it can always connect to the DB by “localhost:5432”. The indirection of the side-car will forward the requests & takes care of finding the correct cloud SQL DB. Also, it is an easy point for logging and so on.
From a security point of view, it is also an improvement. Because if you imagine your web application container is compromised due to an attack through the exposed HTTP API / UI, the attacker is not able to get access to the credentials that are used for DB access, because they are not stored in the container at all.
Autoscaling through HorizontalPodAutoscaler
The next section creates a “HorizontalPodAutoscaler” in order to automatically scale up and down the amount of parallel containers of our application. There is a CPU threshold defined in the description so that once this threshold is reached, new pods will get started / destroyed.
Exposing the app through a Kubernetes service
The last remaining part is to create a service which will take care of exposing the application (in particular a defined TCP port) to the outside world. In this case, I used the type LoadBalancer to achieve that the application will actually be accessible to the outside world. A service in itself normally only exposes pods (or replica sets to be more precise) outside of the Kubernetes cluster.
But we also want to bridge the gap to the world outside of the network that the GKE cluster lives in within the cloud infrastructure. This is where we leave the kubernetes world as this is actually an integration point with the cloud provider, which will then provision a corresponding Load Balancer from their offerings. But still, the API or abstraction to interact with stays in the Kubernetes world, which is pretty neat.
This is just a very brief overview over the configuration of the Kubernetes deployment. Honestly, this is where the Kubernetes magic starts to begin. But for the sake of simplicity I will leave it at this point with this basic configuration. You can dig much deeper into the configuration options of a Kubernetes deployment as this is out of scope for this article.
Trigger the deployment with “kubectl”
In order to trigger the deployment of our deployment description, we need to call the apply cmd of the Kubernetes CLI:
$ kubectl apply -f deployment.ymlWith that, the Kubernetes API server - a central part of the Kubernetes cluster takes the deployment description. The description will go through a so called “reconciliation-loop”.
The Kubernetes system verifies the state of the running cluster and pods. It will then map the desired state (described through the deployment descriptor) and identify the delta. It will also take a look throughout the lifecycle of the cluster if the desired state is still in place. If not, e.g. because a worker node failed, a pod was destroyed etc. it will act accordingly to enforce the desired state by starting another pod.
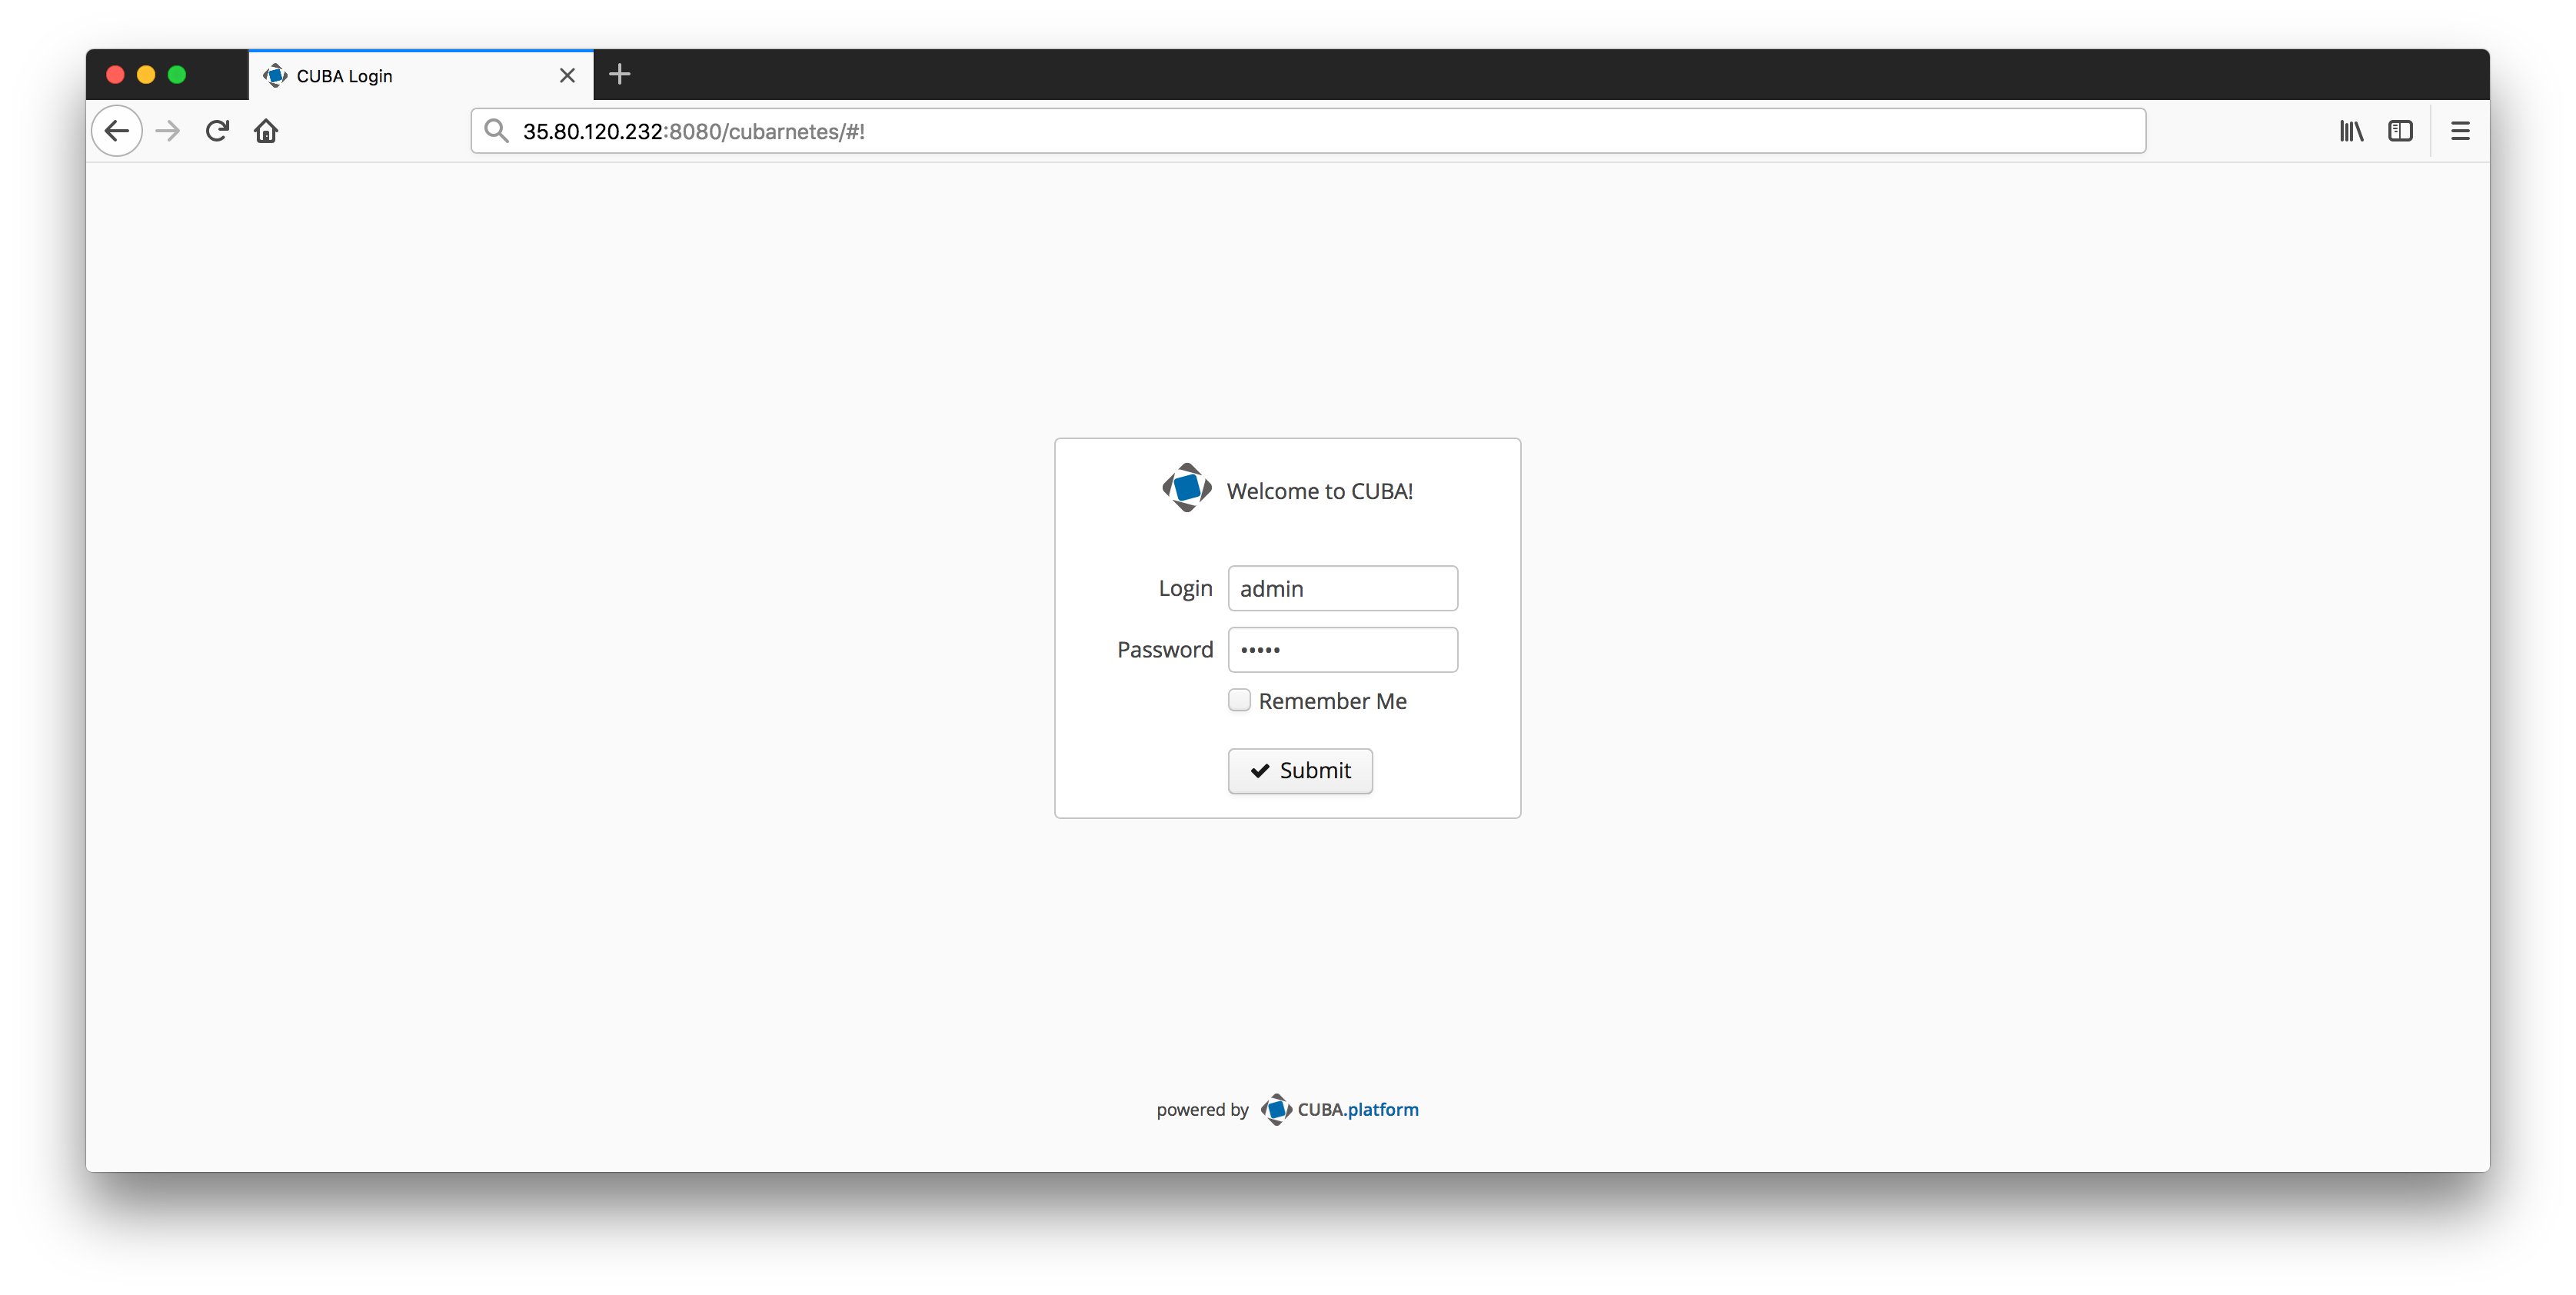
After a couple of seconds after the deployment was triggered, you can head over to the GKE UI, where you look up the external IP address of the kubernetes service which was created. Once you have it, you can open your browser with the corresponding IP, it’s port and the path /cubarnetes
Summary
With this its time to wrap up this series of two blog posts about Kubernetes. The main idea behind Kubernetes is to give developers a common ground to deploy applications to. With the win of the Container wars, it became clear that Kubernetes will become a fundamental building block of deploying & running distributed systems. It also is a starting point for a lot of other projects that are building on the sholders of this giant like Helm or Istio. With that, we will hopefully see the emergence of products that allow running production grade microservice architectures with little need of infrastructure experts.
With the cloud offerings we have seen (like GKE in this case) this challenge will become even easier. They take on the heavy lifting for a lot of things like Cluster management or managed DB services like we used with Google cloud SQL.
Although the effort to configure those managed services is quite low, we still used Terraform in order to get one of the best practices of the DevOps world in place: “infrastructure as code”.
I hope you got a good enough overview on how the interaction with all of those pieces worked. Especially for Kubernetes, it can just be seen as a starting point. The ecosystem of Kubernetes is quite huge and I hope I could give you the feeling that it is worth to be investigated further. If you just want to play around a little bit with Kubernetes in general without going through the initial installation phase of the CLI tools and so on, you can also check out the Kubernetes Courses on Katacoda - a super easy way to learn the technology in the browser.